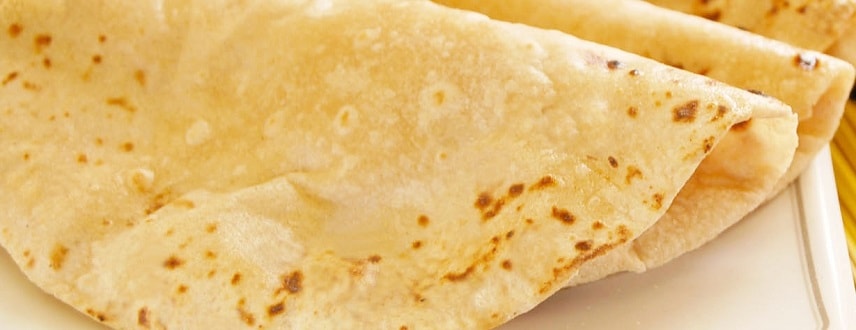
The Roti is the most staple food which is made in every house of every region of India. It is also basically one of the unleavened flat Indian bread made from whole wheat flour. The four staple dishes of Indian food is the Roti, Subzi, Dal and Chawal. Roti is one the main element of these regular staple dishes. The Roti Recipe is easy and simple to try. Even if you are new to cooking, you can make the Chapati at home.
Get Daily Dose of Delicious Recipes… Subscribe Now!
There is more than one interpretation of the word Roti. It can be regular or normal phulka roti or it can the romali roti. You can also prepare the Makai di Roti or Nan Roti. The popular name for the Roti is Phulka or Chapati. Whereas the other names vary with the regions. The traditional way to prepare the Chapati is with the Chapati flour.
It is also known as durum wheat Atta or the simple whole wheat flour (Atta flour). Both the terms, Roti or Chapati mean the same one dish, which is the unleavened Indian wheat flour flatbread. To make the Roti at home, the core element is the finely ground wheat flour. It’s the traditional choice for preparing phulkas at home. You can customize with the roti dough and make it the way you like.
You have to sieve the flour mixture before you can prepare the roti dough. At times, people also prepare the Roti or Phulkas with the half-an-half combination of all-purpose flour and wheat flour. The taste of the Roti is little sweet and mildly sour. The texture is soft and fluffy. The basic preparation of the roti is with the wheat flour and it is cooked on the tava.
Remarks:
- You must keep kneading the dough till it’s soft and pliable.
- The final constancy of the roti dough must be not very soft nor too hard.
- The kneaded Roti dough must be soft but it must not be sticky.
- You can also dust the rolling board with the wheat flour so that Roti does not stick.
- Avoid burning the roti while cooking it directly on the stove.
- Also, do not over-cook the Roti. It can burn and become hard to chew.
- While cooking the Roti, do not allow the air to escape from it.
- You can skip spreading ghee or oil over the surface of the cooked Roti.
- If you are not eating Roti immediately, then store them in such way that they remain warm.
- The leftover Roti dough can be kept in a bowl and stored in the fridge.
Garnishing Idea:
When the roti is hot and warm, drizzle some ghee over. You can also keep a dollop of butter over the cooked Roti. Smear some oil as well and keep the cooked roti covered with cloth.
Serving Suggestion:
The phulka taste best when they are served hot smeared with ghee. It is not compulsory to spread ghee or oil over the cooked Chapati. You can smear it with ghee or serve it plain. You can eat the hot roti or Chapati with almost anything. Check below for the serving suggestions:
- You can eat Roti with various Indian sabzi.
- All the dry or the gravy vegetable dish can be eaten with Roti.
- You can also eat Roti plain with the sweetened Curd. (Check here to make Curd at home.)
- You can apply butter over the Roti and eat it plain.
- The roti can be dipped in the spicy Dal or the Kadhi.
- You can serve hot roti with the Dal Fry.
- The roti can be eaten with the pickle or the chutney.
- Roti’s are also served with a various Paneer (cottage cheese) curry like:
Quick Tip:
- Always make the soft and smooth roti.
- Crisp and hard roti would be like Papad.
- Spreading ghee or oil keeps the Roti soft for a longer time.
- Before storing the Roti, wrap them in kitchen napkin or clean towel.
- You can keep cooked roti in container, casserole or roti basket.
- You may make paratha or Nan from the stored Roti dough.
- The Roti can remain soft or hard depending on the type of flour used.
- The softness of the roti also depends on how well the dough is kneaded.
- You must the warm water or the water at room temperature to knead the dough.
The Roti is also called as “Rotli” in various regions of Gujarat. Not only the name, but even the size, thickness and the texture of Roti varies from one place to another or rather from one house to the next. Whichever way you make it, these roasted flatbreads instantly melt-in-mouth. When they are warm and hot, they taste delicious and are a delight to eat. But when they become dry or if they are left out for long time, they become chew and hard. So it’s always preferred to serve them hot as they are cooked. The round shaped roti are also very healthy, nutritious and tummy-filling.
The basic preparation of these flatbread or phulkas is from the dough of whole wheat flour and water. The ghee or oil is added to make it soft. And the salt is added to balance the flavours. You may add these ingredients or skip. You can also make the various kinds of roti and flavoured roti by adding other ingredients. All the roti taste well and different types of Roti go well with different dishes. While rolling the roti, you can roll them thin or keep medium thickness. The thickness differ from kitchen to kitchen. Rolling needs little efforts, you can roll with rolling board and dust the flour.
Way to Pre-Make and Re-Heat the Roti:
You can also pre-make the Roti and reheat whenever you want to eat them. If you are planning to pre-make the Roti, then just cook the roti little bit. Let the roti roast only till its opaque and its base does not form any brown spots. Cook the roti till its half cooked but not less than ¼ cooked.
This way pre-cook all the roti till the dough is finished. Stack all the pre-cooked roti and store in the roti basket. Now, as once all the rotis are rolled and cooked, then take keep the roti in the freezer.
Whenever you want to eat the Roti, take them out from the fridge and defrost the roti’s. Then, as they come at room temperature, switch on the stove and roast them on the tava with some oil or ghee. This time cook the roti till they become golden with some dark spots.
When you re-heat the Roti, roast it on a full flame. But do not cook it too much. As they are already cooked, they just need to be half cooked. If they are cooked more, then they won’t puff up.
Packing the Roti for the Lunch:
The cooked roti’s do not become soggy. But, if kept at room temperature for a long time, they would become dry and dense. So if you want to pack them for lunch or tiffin then you have to be careful while kneading dough. Use the hot water to add while kneading the dough. Begin to knead once the dough is touchable. This way Roti remain soft for a very long time.
Now, once all the rotis are cooked, apply oil or ghee over the roti surface. Wrap the cooked roti in the aluminium foil and keep it in the lunch boxed. This way the roti remain soft and do not become dry.
How to Make Soft Roti’s?
You can usually make thin and soft roti’s without much of worry at home. Add water only in the required proportion. Do not add too much or too less water. The dough must be soft and smooth but it should not be sticky. Add little ghee or oil but do not add too much of it.
Also, kneading the dough with warm makes soft phulka roti’s at home. Add few drops of water with a spoon but do not use hands. Let the mixture become little warm before you begin to knead.
How to Make Roti with Electronic Roti Maker?
The delicious roti can be made in versatile manners. Surprisingly each method is easy-to-make and you prepare roti at home yourself. But, if you are unsure about rolling the roti and cooking it on the stove, then you can make roti in the electronic roti maker. Firstly you have to prepare the Roti dough and then let it sit for a while. Now begin to make the Roti with the electronic roti maker. Follow the steps to below:
- Clean the cooking table and place the tectonic roti maker.
- Plug its wire in the socket and switch it on.
- Let the electronic roti maker heat for a minute.
- Meanwhile, take the kneaded dough in a bowl.
- Also, keep the bowl of wheat flour on the table.
- Pinch a portion from the roti dough.
- Keep it between your palms and gently roll.
- Roll this small portion into a round shaped ball.
- Then, dip this rolled ball in the dry wheat flour.
- Press the ball between your palms and flatten it.
- Apply the dry flour on all sides of the flattened dough.
- Now, when the roti maker is heated, place the dough in it.
- Close the upper lid of the roti maker.
- Apply pressure and hold the lid of the roti maker.
- Now, bring in the other lever towards the closed lid.
- Continue to press it this way for few seconds.
- Then after some time, remove the lever.
- Now, you can lift the lid of the roti maker.
- The small dough is now rolled into flat later.
- Wait for the Roti to puff up and air bubbles to form.
- Now will the help of the tong, flip the roti to another side.
- Wait, let it cook. Again lightly close the lid of the roti maker.
- The roti blows up and flips out of the roti maker.
- Take it away from the roti maker.
The Difference in Roti/ Chapati:
There is a lot of confusion among the home cooks whether the Phulka Roti or Chapati are same or not. As such, there is not much difference at all in the making of each of them. They both mean the same but there are just minor differences.
The Chapati can be made by pressing the dough balls between the palms and then flattening it. Once it’s rolled, you have to cook it on the tava. Whereas with the Phulka, you have to cook it on the tava and then direct cook it on the stove. As they get direct heat, the air enters and the Phulka puffs up. This means that Chapati is flat whereas phulka roti is puffed up. Once more difference can be the size. The Chapati are thicker and bigger compared to roti.
The Importance of Kneading:
To make the real soft, smooth and puffed up Phulka Roti, you must knead the roti dough very well. In the Roti Recipe, everything may seem easy but the trick is to knead the dough with correct consistency. The more you knead the smoother will be your roti dough. And the roti with the smooth dough will always be smooth and soft to chew. So for the soft Chapati, you must knead the dough well.
The Importance of Resting Time:
The resting of the roti dough in the roti recipe is also very important process. While preparing the Phulka Roti at home, you allow the roti dough to rest for proper time. After you knead the dough, it initiates the formation of gluten strands. The resting of the roti dough begins the gluten linking. Also, the enzymes begin to transform starches into sugar while the dough is resting.
So, the longer time the enzymes make sugars, the tastier the dough will be. But allowing the dough to rest for more than required time can break the gluten link. And the dough can become like puree instead of firm.
Why sometime phulka become hard and chewy?
At times when you overcook the Roti, it can become hard and chewy. If the burner is too high of you have kept the Roti on griddle or tava for a longer time, then it can become hard.
Also, if you are dusted too much flour over the rolled roti dough, then also it can become hard. You must sprinkle the wheat flour over roti so that it does not stick but do not overdo it. Too much of wheat flour coating can create hardness in the cooked Roti.
The roti can be hard if you have rolled it very thin. The thickness of the Roti should be medium, if you make it too thin, then there are high chances of roti being overcooked or burnt.
Also, a lot of hardness or softness of the Roti is dependent on the kneading process of roti dough. The dough must have correct proportion of water. The dough must not be too hard, it has to soft. Also, the dough cannot be moist with puree like consistency. Add warm water to knead the dough and use little curd or milk for softness.
Related Posts
Banh Xeo: How to Make Vietnamese Crepe

Takoyaki: How to Make Japanese-Style Takoyaki
Sauerkraut: How to Make German Sauerkraut
How to Make Tomato Sauce at Home : Quick and Easy Guide!
Curry: How to Make Thai Green Curry